
The digital product idea that I have chosen to pursue first is the Fantasy Character Creator Toolkit. I was very excited to start this idea and immediately began messing around with files, trying to figure out the best way to approach creating the characters.
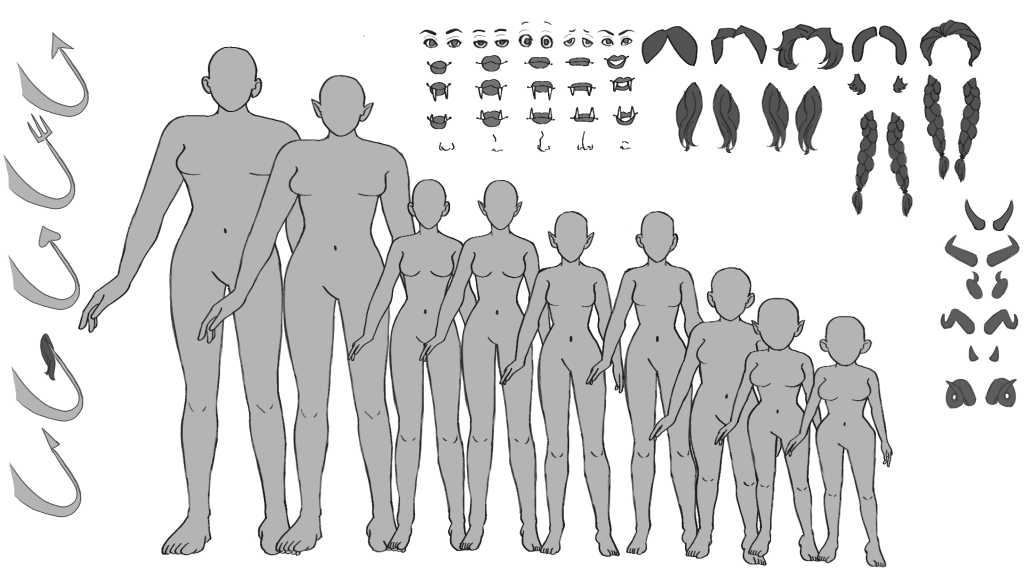
My original idea for how the toolkit would work is that there would be individual body parts for the user to build their character completely. I tried to create a doll like this, but I ended up hating it. I was able to find other character creator toolkits that successfully employed the method I originally had in mind, such as this one, which is used to create female characters. However, I just genuinely did not like drawing the individual body parts. So, rather than committing to a creation method I hated, I decided to draw the whole bodies instead and offer a diverse range of them.
I also decided to expand how I would deliver the product. Initially, the plan was to offer the PNGs in a zipped file for the user to pull into any program. I will still offer this, but I also plan to provide both a Clip Studio Paint file with all the PNGs in a composition together, as well as a Photoshop file. I chose these software programs because they are the ones I have access to.
I tested the PNGs in Adobe Illustrator, but I didn’t find it to be a good program for handling the files, as it lacks a fill/bucket tool. Someone could potentially use Adobe Illustrator with these files, but I would not recommend it. Other character toolkits, such as this one, use Adobe Illustrator to create adorable toddler characters. Rather than hand-drawn, these characters are created using vector shapes in Photoshop. This one could be easily moved into Adobe Illustrator and be color-changeable. Doing vector shapes would be another method to make this project. However, I really like the hand-drawn feeling over the accessibility of using vector shapes. Instead, future prototypes will use vector layers.
Something that I figured out is that Clip Art Studio can create vector layers instead of raster layers. I attempted to use this feature after I had already drawn the prototype pieces, but I ran into an issue. The program, which changed the layers from raster to vector, caused the images to distort and significantly deteriorate. For art to be vectorized without distortion, it must be redrawn on a vector layer from the beginning. Although this realization was annoying, creating multiple prototypes is an essential part of the process. Only the line art layers will need to be vector layers, as it seems to make the color unchangeable-in Clip Studio at least- and so the color layers will remain raster layers.
To also help with the scalability of the parts, I plan to ensure that the Toolkit’s DPI is set to 300px, as is recommended for Clip Art. I want to ensure that the parts are scalable, allowing the user to resize them to match the body size of the character they have selected. Initially, I had planned to redraw each body part for each body size, but I quickly realized how ineffective this approach was. So, instead, I decided to draw each part for the largest body size, then scale it to fit any of the other body sizes.
One aspect I am admittedly not looking forward to is the inevitable creation of a tutorial video. While I plan to provide written instructions and visual guides on how to use the toolkit, I also intend to create a video demonstrating its use, ensuring clarity for the user. Talking on video always makes me nervous, even with a script and practice in place. Still, I feel a tutorial video is a needed part of this product. The toddler character creator I mentioned earlier has a tutorial video that clearly explains how to use it. I think it is better to overexplain to the user rather than leave them questioning.
Another aspect I aim to improve in the next prototype of the character toolkit is the quality of the lines themselves. Part of it, I think, is that as I was drawing the toolkit, the DPI was only at 72px. I was able to increase the DPI to 300px for the prototype, but the quality could be improved if the original image were also at 300px. I also feel as though I am not fully utilizing the capabilities of Clip Studio Paint to the best of my ability. So, I turned to the free tutorials that the program offers. From an article offering tips for beginners in digital art, I learned about utilizing the stabilization feature of the pen I’m using to draw, as well as how to use a vector layer more effectively.
Overall, I think that the progress of the Fantasy Character Creator Toolkit is going well. As I work on the prototype, I am refining the best ways to complete this project. While things have not always gone the way I was hoping, I have been able to adapt and continue each time.
REFERENCES
Luckyqilin. (n.d.). Drawing perfect lines for beginners by Luckyqilin – Make better art. CLIP STUDIO TIPS. https://tips.clip-studio.com/en-us/articles/8712
Prado, L. (2021, May 27). A complete guide to Clipart – usage ideas and more!. TWG Designs. https://www.twgdesigns.com/blogs/blog/clipart-guide?srsltid=AfmBOoooirCQ83TRgc5gZRGaF-6bwY5tTLPacilYKjfW_Fh6RnOgIj0v
PRODUCTS
https://graphicriver.net/item/character-generator/16204922
